Spring Security Config #3
Description
Spring Security Config
Spring Security Config
전에 먼저 알고가기!
@responsebody
✅ @controller 가 클래스레벨에 붙으면 return 시 String은 뷰 리졸버를 호출하게 된다.
→ 즉, ok 라는 뷰 템플릿을 찾게 된다.
하지만 뷰 템플릿을 사용하지 않고 문자 그대로를 리턴하고 싶으면 컨트롤러 레벨에 @ResponseBody 를 붙이면 문자가 http 응답 메세지 바디에 그대로 들어간다.

HTML이 아니라 데이터(객체)를 전달한다. ➡️ @ResponseBody
즉, 응답시 HTML 이 아닌, JSON 형식의 데이터를 리턴
주로 JSON 형식 사용함.
웹 브라우저는 HTML이 아닌 JSON 형식은 해석 할 수 없다.
➡️ stringfy() 메소드 사용해서 JSON 형식을 String 형식으로 바꿔줘서 웹브라우저가 해석할 수 있도록 해줌.
이제 Spring Security 설정을 해보자!
Spring Security 설정
Dependency 설정
//스프링 시큐리티 관련
implementation 'org.springframework.boot:spring-boot-starter-security'
implementation 'org.thymeleaf.extras:thymeleaf-extras-springsecurity5'
Spring Security 를 사용하기 위해서는 org.springframework.boot:spring-boot-starter-security 를 dependency로 잡아줘야 한다.
- 보통은 정적 자원 (image, css..)에 대해서는 security 설정을 하지 않는다.
SecurityConfig 규칙 설정
페이지 권한을 위한 SecurityConfig 규칙을 설정한다.
- .antMatchers()
- 페이지에 접근할 수 있는 권한을 설정한다.
- .loginPage
- 로그인 페이지
- .loginProcessingUrl
- 구현한 로그인 페이지
- defaultSuccessUrl
- 로그인 성공 시 제공할 페이지
- failureUrl
- 로그인 실패 시 제공할 페이지
- csrf().disable()
- 사이트 간 요청 위조(Cross-Site Request Forgery) 공격 방지 기능 키기
package com.karim.simpleBoard.configuration;

import com.karim.simpleBoard.service.UserService;
import lombok.RequiredArgsConstructor;
import org.springframework.security.config.annotation.authentication.builders.AuthenticationManagerBuilder;
import org.springframework.security.config.annotation.web.builders.HttpSecurity;
import org.springframework.security.config.annotation.web.configuration.EnableWebSecurity;
import org.springframework.security.config.annotation.web.configuration.WebSecurityConfigurerAdapter;
import org.springframework.security.crypto.bcrypt.BCryptPasswordEncoder;

**@EnableWebSecurity**        **// spring security 를 적용한다는 Annotation**
@RequiredArgsConstructor
public class SecurityConfig extends WebSecurityConfigurerAdapter {

    private final UserService userService;
    /**
     * **규칙 설정**
     * @param http
     * @throws Exception
     */
    @Override
    protected void configure(HttpSecurity http) throws Exception {
        http
            .authorizeRequests()
								// 아래 기재한 url 에 대해서는 security 를 설정함
                .antMatchers( "/login", "/singUp", "/access_denied", "/resources/**").permitAll() // 로그인 권한은 누구나, resources파일도 모든권한
                // USER, ADMIN 접근 허용
                .antMatchers("/userAccess").hasRole("USER")
                .antMatchers("/userAccess").hasRole("ADMIN")
                .and()
						// 로그인 하는 경우에 대해 설정
            .formLogin()
								// 로그인 페이지를 제공하는 URL을 설정함
                .loginPage("/login")
								// 로그인 성공 URL을 설정함
                .loginProcessingUrl("/login_proc")
                .defaultSuccessUrl("/user_access")
								// 로그인 실패 URL을 설정함
                .failureUrl("/access_denied") // 인증에 실패했을 때 보여주는 화면 url, 로그인 form으로 파라미터값 error=true로 보낸다.
                .and()
            .csrf().disable();		// 로그인 창
    }

    /**
     * **로그인 인증 처리 메소드**
     * @param auth
     * @throws Exception
     */
    @Override
    public void configure(AuthenticationManagerBuilder auth) throws Exception {
        auth.userDetailsService(userService).passwordEncoder(new BCryptPasswordEncoder());
    }
}- @EnableWebSecurity
- 이 어노테이션을 적용하면 Spring boot 에서 Secirity를 사용할 수 있다.
- antMatchers()
- Security 를 설정할 URL을 기재한다.
- antMatchers().hasRole()
- Security 를 설정할 URL에 접근 대상 레벨을 설정한다.
- .antMatchers().authenticated()
- 해당 URL에 접근하려면 인증과 인가가 이루어져야 한다는 설정.
@EnableWebSecurity 를 설정하지 않으면 Spring Security 설정이 적용되지 않는다!!
이 설정을 하지 않고 스프링 부트를 실행시켜 RestAPI를 요청하면 401 unauthorized 가 뜰 수 있음
코드를 보고 이해해보자.
- Gradle
plugins {
	id 'org.springframework.boot' version '2.7.2'
	id 'io.spring.dependency-management' version '1.0.12.RELEASE'
	id 'java'
}

group = 'me.jihye'
version = '0.0.1-SNAPSHOT'
sourceCompatibility = '1.8'

configurations {
	compileOnly {
		extendsFrom annotationProcessor
	}
}

repositories {
	mavenCentral()
}

dependencies {
	implementation 'org.springframework.boot:spring-boot-starter-data-jpa'
	**implementation 'org.springframework.boot:spring-boot-starter-security'**
	implementation 'org.springframework.boot:spring-boot-starter-validation'
	implementation 'org.springframework.boot:spring-boot-starter-web'
	compileOnly 'org.projectlombok:lombok'
	runtimeOnly 'com.h2database:h2'
	annotationProcessor 'org.projectlombok:lombok'
	testImplementation 'org.springframework.boot:spring-boot-starter-test'
	testImplementation 'org.springframework.security:spring-security-test'
}

tasks.named('test') {
	useJUnitPlatform()
}- HelloRestController
package me.jihye.leanjwt.controller;

import org.springframework.http.ResponseEntity;
import org.springframework.web.bind.annotation.GetMapping;
import org.springframework.web.bind.annotation.RequestMapping;
import org.springframework.web.bind.annotation.RestController;

@RestController
@RequestMapping("/api")
public class HelloController {

    @GetMapping("/hello")
    public ResponseEntity<String> hello() {
        return ResponseEntity.ok("hello");
    }
}
이 상태에서 main 을 실행하고, /api/hello 를 요청하면 401 unauthorized 오류가 뜬다.
스프링 시큐리티를 디펜던시에 추가해 모든 요청은 인증 필터를 거치게 되면서 401 인증/인가 오류가 뜬 것이다.
이제 Spring Security 필터 설정을 추가해서 각각의 url에 맞게 시큐리티 필터를 적용시켜보자.
- SpringSecurityConfig
package me.jihye.leanjwt.config;

import org.springframework.security.config.annotation.web.builders.HttpSecurity;
import org.springframework.security.config.annotation.web.configuration.EnableWebSecurity;
import org.springframework.security.config.annotation.web.configuration.WebSecurityConfigurerAdapter;

**@EnableWebSecurity**
public class SecurityConfig extends WebSecurityConfigurerAdapter {

    @Override
    protected void configure(HttpSecurity http) throws Exception {
        http
                **.authorizeRequests()
                .antMatchers("/api/hello").permitAll() // '/api/hello' url 요청은 인증 없이 모든 접근을 허용 : permitAll()
                .anyRequest().authenticated(); // 나머지 요청은 모두 인증해야함**
    }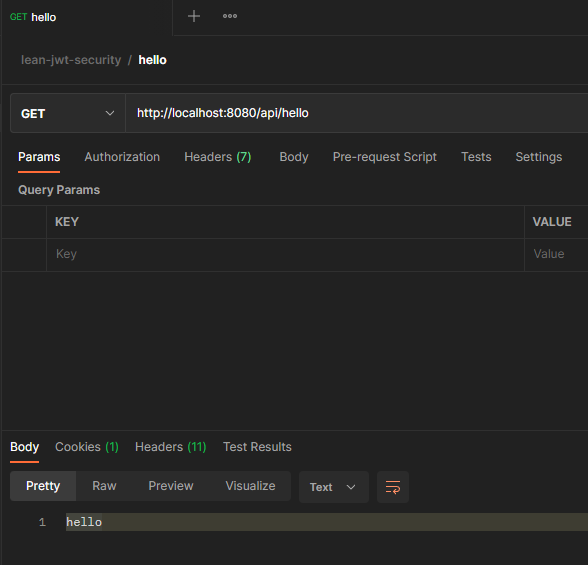
}‘/api/hello’ 요청은 인증/인가 없이 모두 접근 가능하도록 설정
이외의 나머지 url 요청은 모두 인증해야함
- 결과
위의 SpringSecurityConfig를 설정하지 않았을 때는 401 오류가 떴음!