![]()
-
- A diary note application to allow users to create and delete notes, with a calendar view to display the notes by date.
- It includes features like:
- Creating and deleting notes
- Calendar view to display notes by date
- Profile view with last notes and mood recap
- Sign-in with Google and GitHub
- Emotion picker for mood selection
- Firestore database for storing notes, Firebase authentication for user management
- API: Firebase Firestore, Firebase Authentication, Google OAuth, GitHub OAuth
-
- A weather application that allows users to search for weather information by city.
- It includes features like:

- Search functionality for cities or current location
- Display of current weather conditions
- Display of hourly weather forecast
- Display of weather forecast for the next 7 days
- Integration with Open Meteo API for weather data
- API: Open Meteo Geocoding API and Weather API, Google Reverse Geocoding API
-
- A simple calculator application that allows users to perform basic arithmetic operations.

There are 4 main ways to develop mobile applications:
flowchart TB
    subgraph Native["Native Apps"]
      direction TB
        N["Platform-Specific Code
        • iOS: Swift/Objective-C
        • Android: Java/Kotlin"]
        NA["Direct Hardware Access
        Best Performance"]
    end

    subgraph Cross["Cross-Platform"]
      direction TB
        CP["Shared Codebase
        • React Native
        • Flutter
        • Xamarin"]
        CA["Compiled to Native
        Near-Native Performance"]
    end

    subgraph Hybrid["Hybrid Apps"]
      direction TB
        H["Web Technologies
        • HTML/CSS/JS
        • Cordova/Ionic"]
        HA["Web Container
        Good Performance"]
    end

    subgraph PWA["Progressive Web Apps"]
      direction TB
        P["Web Technologies
        • HTML/CSS/JS
        • Modern APIs"]
        PA["Browser Runtime
        Limited Device Access"]
    end

    N --> NA
    CP --> CA
    H --> HA
    P --> PA

    classDef native fill:#ff9999,stroke:#ff0000,color:#000
    classDef cross fill:#99ff99,stroke:#00ff00,color:#000
    classDef hybrid fill:#9999ff,stroke:#0000ff,color:#000
    classDef pwa fill:#ffff99,stroke:#ffff00,color:#000

    class N,NA native
    class CP,CA cross
    class H,HA hybrid
    class P,PA pwa
Breakdown of Each Approach:
- Native Applications
- Written specifically for each platform
- Best performance and direct hardware access
- Requires separate codebases for iOS and Android
- Higher initial investment but optimal results
- Cross-Platform Development
- Single codebase for multiple platforms
- Popular frameworks include Flutter and Xamarin
- Better resource utilization compared to hybrid apps
- Ideal for complex applications needing native performance
- Hybrid Applications
- Built using web technologies (HTML/CSS/JavaScript)
- Runs in a web container with native bridge
- Easier to maintain but may have performance limitations
- Good for simpler applications or web-first experiences
- Progressive Web Apps (PWAs)
- Web applications with app-like features
- No installation required
- Works across devices through browsers
- Limited access to device hardware
- Visual and interactive parts users experience directly
- Resides on the device or accessible through browser
- Focuses on user interface and experience
- Handles data processing and storage
- Manages API connections
- Provides cloud services integration
- Mobile devices have limited processing power and memory
- Apps must be optimized for performance
- Consider offloading heavy processing to cloud services
- Design for touch interfaces
- Keep navigation simple and intuitive
- Optimize for mobile screen sizes
- App store requirements differ between platforms
- iOS requires $99/year developer program fee
- Android charges a one-time $25 registration fee
- Start with core features and expand gradually
- Test thoroughly on multiple devices
- Consider platform-specific optimizations
- Use cloud services for heavy processing
- Implement efficient data caching
- Optimize resource usage
- Implement proper authentication
- Secure data transmission
- Follow platform security guidelines
Typescript Typescript - React Cheatsheets
ADB stands for Android Debug Bridge, a versatile command-line tool that lets you communicate with an emulator instance or connected Android device. It is a client-server program that includes three components:
- A client, which runs on your development machine
- A daemon (adbd), which runs on the device
- A server, which manages communication between the client and the daemon The client sends commands to the server, which forwards them to the daemon running on the device. The daemon executes the commands and returns the results to the client. The ADB client can be used to perform various tasks, such as installing and debugging apps, copying files, and running shell commands on the device. The ADB server manages communication between the client and the daemon, ensuring that commands are executed correctly.
React Native: Setup ReactNative - recommandation for Expo Expo: Template to Setup
# Create a new Expo app with TypeScript template and blank file structure
npx create-expo-app --template blank-typescript
or
# Create a new Expo app with TypeScript template and file structure
npx create-expo-app@latest
with React Native CLI:
npx @react-native-community/cli@latest init project_name- Node.js (LTS version recommended)
- Java Development Kit (JDK): https://adoptium.net/installation/linux/
- Android SDK: https://developer.android.com/studio/install
- Watchman: https://facebook.github.io/watchman/docs/install
Use npx react-native doctor to check your environment.
ReactNative - Running on Device
Setup adb and run the following commands:
# Show devices and start adb daemon if not running
adb devices
# (useful for debugging with Metro Bundler and React Native DevTools)
# This command allows the device to connect to the host machine on port 8081
adb reverse tcp:8081 tcp:8081
# and or
adb reverse tcp:8087 tcp:8087Start the Expo server:
npx expo start# Run the app on Android device with adb in dev build mode
npx expo start --tunnel --dev-client# Build the app
npx expo run:android# Clean the dev build (android, ios, ...) files
npx expo prebuildStart with React Native CLI (better adb - pc and device connection):
# JS build tool for ReactNative - Metro
npm start
# in another terminal
# Build and run the app
npm run androidMetro is a JavaScript bundler for React Native applications. It is responsible for transforming and serving your JavaScript code, allowing you to run your app on Android and iOS devices. Metro is designed to work with React Native and provides features like hot reloading, which allows you to see changes in your app without needing to rebuild it completely. It also handles the resolution of JavaScript modules and assets, ensuring that your app runs smoothly on different platforms.
Watchman is a file-watching service developed by Facebook. It is used by Metro to monitor changes in your project files and trigger updates in the development environment. Watchman helps improve the performance of the development process by efficiently tracking file changes and notifying Metro when it needs to rebuild or reload the app.
Gradle is a build automation tool used by Android Studio to compile and package Android applications. It is responsible for managing dependencies, building the app, and generating the final APK (Android Package) file that can be installed on Android devices.
Babel is a JavaScript compiler that allows you to use the latest JavaScript features in your React Native applications. It transforms modern JavaScript code into a version that is compatible with older devices and browsers, ensuring that your app runs smoothly across different platforms.
Configuring Babel ReactNative - Babel
Medium Project Structure:
.
├── android
│   └── ...
├── ios
│   └── ...
├── App.tsx
├── app.json
├── assets
│   ├── icon.png
│   └── splash.png
├── components
│   ├── Buttons
│   │   ├── SquareButton.tsx
│   └── Cards
│       ├── Card.tsx
│       └── CardItem.tsx
├── constants
│   ├── Colors.ts
│   └── Layout.ts
├── hooks
│   ├── useFetch.ts
│   └── useTheme.ts
├── navigation
│   ├── AppNavigator.tsx
│   └── NavigationContainer.tsx
├── pages/screens
│   ├── HomePage.tsx
│   ├── DetailsPage.tsx
│   └── SettingsPage.tsx
├── services
│   ├── api.ts
│   └── auth.ts
├── styles
│   ├── GlobalStyles.ts
│   └── Theme.ts
├── utils
│   ├── formatDate.ts
│   └── validateInput.ts
├── __tests__
│   ├── App.test.tsx
│   ├── components
│   │   ├── Buttons
│   │   │   ├── SquareButton.test.tsx
│   │   └── Cards
│   │       ├── Card.test.tsx
│   │       └── CardItem.test.tsx
│   └── ...
├── node_modules
│   └── ...
└── ...
Large project structure:
MyApp
├── modules
│   ├── accounts
│   │   ├── components
│   │   ├── pages
│   │   └── ...
│   ├── growth
│   │   ├── components
│   │   ├── pages
│   │   └── ...
│   └── shared
│       ├── components
│       ├── hooks
│       └── ...
└── App.js
## Create file structure
mkdir -p src/{components,constants,hooks,assets,screens,services,styles,utils,__tests__}ReactNative - Layout - FlexBox ReactNative - Style
# Install react-native-vector-icons
npm install react-native-vector-icons-
Icons sets generators for each different sizes:
- Expo:
- Simple - Expo - App Icon Generator - Favicon, Splash, Icon
- Better is Figma template: Expo - Figma Template - App Icon Generator
- React Native - App Icon Generator:
- Icon Kitchen - App Icon sets generator
- App Icon Generator
- Some edit might be needed with AndroidManifest.xml or Info.plist (or other config file) to make sure the icons files are compatible with OS icons configuration.
- Expo:
- ReactNative - SVG: https://github.com/software-mansion/react-native-svg/blob/main/USAGE.md
- Transform SVG to React: https://react-svgr.com/playground/
- SVG cheatsheet: https://pcx3.com/cheatsheets/svg-cheatsheet/ https://cheat-sheets.org/own/svg/index.xhtml
BlurHash is a compact representation of a placeholder image that can be used to display a blurred version of an image while the actual image is loading. It is particularly useful for improving the user experience in applications where images are loaded asynchronously.
Expo Font provide build in config handling of fonts.
With react native without expo u can use react-native-asset to do that.
npx react-native-assetReactNative - Gesture Handler Gesture Handler - States
flowchart TD
    Start([Start]) --> Check{Check Permission<br/>Status}

    Check -->|GRANTED| Success([Permission Granted])
    Check -->|DENIED| ShowRationale{Show Rationale<br/>Dialog?}
    Check -->|NEVER_ASK_AGAIN| Settings([Direct to App<br/>Settings])

    ShowRationale -->|Yes| Request[Request Permission]
    ShowRationale -->|No| HandleDenial([Handle Denied<br/>State])

    Request --> Check

    Settings --> OpenSettings[Open App Settings]
    OpenSettings --> Restart([App Auto-Restarts])
    Restart --> Check

    classDef decision fill:#f9f,stroke:#333,stroke-width:2px,color:#000
    classDef action fill:#bbf,stroke:#333,stroke-width:2px,color:#000
    classDef terminal fill:#bfb,stroke:#333,stroke-width:2px,color:#000

    class Check,ShowRationale decision
    class Request,OpenSettings,Restart action
    class Success,HandleDenial terminal
In Android, permissions are defined in the AndroidManifest.xml file. This file is located in the android/app/src/main directory of your React Native project. You can add permissions by including <uses-permission> tags within the <manifest> tag. Here is an example of how to add permissions in the AndroidManifest.xml file:
<manifest xmlns:android="http://schemas.android.com/apk/res/android"
    package="com.example.app">

    <application
        android:allowBackup="true"
        android:icon="@mipmap/ic_launcher"
        android:label="@string/app_name"
        android:roundIcon="@mipmap/ic_launcher_round"
        android:supportsRtl="true"
        android:theme="@style/AppTheme">
        <activity
            android:name=".MainActivity"
            android:label="@string/app_name"
            android:exported="true">
            <intent-filter>
                <action android:name="android.intent.action.MAIN" />
                <category android:name="android.intent.category.LAUNCHER" />
            </intent-filter>
        </activity>
    </application>

    <!-- Add permissions here -->
    <uses-permission android:name="android.permission.INTERNET" />
    <uses-permission android:name="android.permission.ACCESS_FINE_LOCATION" />

</manifest>Apple - Permissions - iOS - Info.plist Apple - Permissions - iOS - Info.plist - Localization
In iOS, permissions are defined in the Info.plist file. This file is located in the ios/[YourProjectName]/ directory of your React Native project. You can add permissions by including specific keys and their corresponding usage descriptions. Here is an example of how to add permissions in the Info.plist file:
<?xml version="1.0" encoding="UTF-8"?>
<!DOCTYPE plist PUBLIC "-//Apple//DTD PLIST 1.0//EN" "http://www.apple.com/DTDs/PropertyList-1.0.dtd">
<plist version="1.0">
<dict>
    <key>CFBundleDisplayName</key>
    <string>YourAppName</string>
    <key>CFBundleIdentifier</key>
    <string>com.example.app</string>
    <key>CFBundleVersion</key>
    <string>1.0</string>
    <key>CFBundleShortVersionString</key>
    <string>1.0</string>

    <!-- Add permissions here -->
    <key>NSLocationWhenInUseUsageDescription</key>
    <string>This app requires access to your location.</string>

     <!-- Other keys and values -->
</dict>
</plist>React Native Community - Geolocation
- Videos:
# Manual redirect with uri-scheme
npx uri-scheme open your_app://your_redirect --android
# Check uri mapping
npx uri-scheme list# Check expo router site mapping
npx expo-router-sitemaphttps://developer.android.com/guide/components/intents-filters
Intents are used in Android to allow applications to communicate with each other. They can be used to start activities, services, or broadcast receivers. In the context of deep linking, intents are used to handle incoming links and navigate to the appropriate screen within the app.
To set up deep linking in a React Native application, you need to define an intent filter in the AndroidManifest.xml file. This filter specifies the URL scheme and host that your app can handle. Here is an example of how to set up an intent filter for deep linking:
<activity
    android:name=".MainActivity"
    android:label="@string/app_name"
    android:exported="true">
    <intent-filter>
        <action android:name="android.intent.action.VIEW" />
        <category android:name="android.intent.category.DEFAULT" />
        <category android:name="android.intent.category.BROWSABLE" />
        <data
            android:scheme="your_app"
            android:host="your_redirect" />
    </intent-filter>
</activity>
This intent filter allows your app to handle links with the scheme your_app and the host your_redirect. When a user clicks on a link that matches this pattern, Android will launch your app and pass the link data to it.
- Type of action:
android.intent.action.VIEW: This action is used to view data, such as a web page or an image.android.intent.action.MAIN: This action is used to start the main activity of your app.- ...
- Type of category:
android.intent.category.DEFAULT: This category is used for activities that can be launched by default.android.intent.category.BROWSABLE: This category allows your app to be launched from a web browser or other applications.android.intent.category.LAUNCHER: This category is used for the main entry point of your app, allowing it to be launched from the home screen or app drawer.- ...
- Type of data:
android:scheme: This attribute specifies the URL scheme that your app can handle, such ashttp,https, or a custom scheme likeyour_app.android:host: This attribute specifies the host part of the URL that your app can handle, such asyour_redirect.- ...
# Build the Android unsigned / signed APK
cd android
./gradlew assembleRelease
Deep linking is a way to link to specific content within a mobile application. It allows users to navigate directly to a particular screen or feature in the app, rather than just opening the app's home screen. But it also introduces security considerations, as deep links can potentially expose sensitive information or allow unauthorized access to certain parts of the app.
flowchart LR
    Start["Need to store<br/>data?"] --> Q1{"Is it sensitive<br/>information?"}

    Q1 -->|"Yes"| Secure["Use Secure Storage:<br/>#8226; Authentication tokens<br/>#8226; Passwords<br/>#8226; Encryption keys"]

    Q1 -->|"No"| Q2{"What type of<br/>data?"}

    Q2 -->|"Simple key-value<br/>pairs"| AsyncStorage["Use an Async Storage:<br/>#8226; User preferences<br/>#8226; App settings<br/>#8226; Non-sensitive strings"]

    Q2 -->|"Structured data<br/>or large datasets"| DB["Consider Database:<br/>#8226; Complex relationships<br/>#8226; Large amounts of data<br/>#8226; Query requirements"]

    style Start fill:#f9f,stroke:#333,color:#000
    style Q1 fill:#bbf,stroke:#333,color:#000
    style Q2 fill:#bbf,stroke:#333,color:#000
    style Secure fill:#dfd,stroke:#333,color:#000
    style AsyncStorage fill:#dfd,stroke:#333,color:#000
    style DB fill:#dfd,stroke:#333,color:#000
To store data in a React Native application, you can use various methods depending on the type of data and persistence requirements.
- React Native - Calendar by Wix
- Documentation: https://wix.github.io/react-native-calendars/docs/Intro
Jest Jest - ReactNative Jest - Snapshot Testing
flowchart LR
    Start([Start]) --> Check{Check Auth<br/>Status}

    Check -->|Authenticated| Success([User Authenticated])
    Check -->|Not Authenticated| ShowLogin{Show Login<br/>Form?}

    ShowLogin -->|Yes| Request[Request Login]
    ShowLogin -->|No| HandleUnauth([Handle Unauthenticated<br/>State])

    Request --> Check

    classDef decision fill:#f9f,stroke:#333,stroke-width:`px,color:#000
    classDef action fill:#bbf,stroke:#333,stroke-width:1px,color:#000
    classDef terminal fill:#bfb,stroke:#333,stroke-width:1px,color:#000

    class Check,ShowLogin decision
    class Request action
    class Success,HandleUnauth terminal
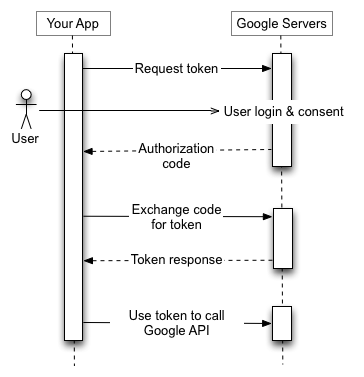
Example of Google Authentication Flow:
Schema of Authentication Flow with Firebase :
flowchart LR
    Start([Start]) --> Check{Auth Provider<br/>User State}

    Check -->|Authenticated| Success([User Authenticated])
    Check -->|Not Authenticated| ShowLogin([Show Login<br/>Page])

    ShowLogin --> ChooseProvider{Choose Auth<br/>Provider?}


    subgraph ExpoAuthSession["Expo Auth Session - Web Browser"]
      direction TB
        GithubOauthCode[Request GitHub<br/>0Auth]
    end
    ChooseProvider -->|GitHub| GithubOauthCode

    subgraph FetchToken
      direction TB
        GithubToken[Fetch GitHub<br/>Access Token]
    end
    GithubOauthCode --> GithubToken

    ChooseProvider -->|Google| RequestGoogle[Request Google<br/>Auth]
    RequestGoogle --> FirebaseCredential[Create Firebase<br/>Credential]

    subgraph FirebaseAuth
      direction TB
        FirebaseCredential[Create Firebase<br/>Credential]
        FirebaseLogin[Login to Firebase]
        FirebaseCredential --> FirebaseLogin[Login to Firebase]
    end
    GithubToken --> FirebaseCredential[Create Firebase<br/>Credential]

    FirebaseLogin --> Check

    classDef decision fill:#f9f,stroke:#333,stroke-width:2px,color:#000
    classDef action fill:#bbf,stroke:#333,stroke-width:2px,color:#000
    classDef terminal fill:#bfb,stroke:#333,stroke-width:2px,color:#000

    class Check,ChooseProvider decision
    class Request,ShowLogin,GithubOauthCode,GithubToken,FirebaseCredential,FirebaseLogin action
    class Success,HandleUnauth terminal
Signing Report is used to generate a unique key for signing your Android app. This key is essential for publishing your app on the Google Play Store and ensuring its authenticity.
# Generate a signing report for your Android app
cd android
./gradlew signingReport- Firebase Authentication
- Firebase with Expo: https://docs.expo.dev/guides/using-firebase/
- Firebase react native: https://rnfirebase.io/#installation-for-react-native-cli-non-expo-projects
- App auth react native: https://nearform.com/open-source/react-native-app-auth/docs/
- Firebase dashboard
- Google auth: https://console.cloud.google.com/auth/clients
- Github Oauth app: https://github.com/settings/developers