- Kubeflow v1.2.0 (https://github.com/kubeflow/kubeflow)
- Argo v2.12.10 (https://github.com/argoproj/argo)
- Jupyter (https://github.com/jupyter/notebook)
- Katib v0.11.0 (https://github.com/kubeflow/katib)
- KFServing v0.5.1 (https://github.com/kubeflow/kfserving)
- Training Job
- TFJob v1.0.0 (https://github.com/kubeflow/tf-operator)
- PytorchJob v1.0.0 (https://github.com/kubeflow/pytorch-operator)
- Notebook-controller b0.0.4
- ...
- Storage class
- 아래 명령어를 통해 storage class가 설치되어 있는지 확인한다.
$ kubectl get storageclass
- 만약 storage class가 없다면 storage class를 설치해준다.
- Storage class는 있지만 default로 설정된 것이 없다면 아래 명령어를 실행한다.(storage class로 rook-ceph이 설치되어 있을 경우에만 해당)
$ kubectl patch storageclass csi-cephfs-sc -p '{"metadata": {"annotations":{"storageclass.kubernetes.io/is-default-class":"true"}}}' - csi-cephfs-sc는 rook-ceph를 설치했을 때 생성되는 storage class이며 다른 storage class를 default로 사용해도 무관하다.
- 아래 명령어를 통해 storage class가 설치되어 있는지 확인한다.
- Istio
- Cert-manager
- ai-devops에서 사용하는 certificate와 cluster-issuer와 같은 CR 관리를 위해 필요하다.
- (Optional) GPU plug-in
- Kubernetes cluster 내 node에 GPU가 탑재되어 있으며 AI DevOps 기능을 사용할 때 GPU가 요구될 경우에 필요하다.
설치를 진행하기 전 아래의 과정을 통해 필요한 이미지 및 yaml 파일을 준비한다.
- 이미지 준비
- 아래 링크를 참고하여 폐쇄망에서 사용할 registry를 구축한다.
- 자신이 사용할 registry의 IP와 port를 입력한다.
$ export REGISTRY_ADDRESS=192.168.9.216:5000 - 아래 명령어를 수행하여 Kubeflow 설치 시 필요한 이미지들을 위에서 구축한 registry에 push하고 이미지들을 tar 파일로 저장한다. tar 파일은 images 디렉토리에 저장된다.
$ wget https://raw.githubusercontent.com/tmax-cloud/install-ai-devops/5.0/image-push.sh $ wget https://raw.githubusercontent.com/tmax-cloud/install-ai-devops/5.0/imagelist $ chmod +x ./image-push.sh $ ./image-push.sh ${REGISTRY_ADDRESS} - 아래 명령어를 수행하여 registry에 이미지들이 잘 push되었는지, 그리고 필요한 이미지들이 tar 파일로 저장되었는지 확인한다.
$ curl -X GET ${REGISTRY_ADDRESS}/v2/_catalog $ ls ./images - (Optional) 만약 설치에 필요한 이미지들을 pull받아서 tar 파일로 저장하는 작업과 로드하여 push하는 작업을 따로 수행하고자 한다면 image-push.sh이 아니라 image-save.sh, image-load.sh를 각각 실행하면 된다.
- image-save.sh을 실행하면 설치에 필요한 이미지들을 pull 받아서 images 디렉토리에 tar 파일로 저장한다.
$ wget https://raw.githubusercontent.com/tmax-cloud/install-ai-devops/5.0/image-save.sh
$ chmod +x ./image-save.sh
$ ./image-save.sh
$ ls ./images
- 위에서 저장한 images 디렉토리와 image-load.sh을 폐쇄망 환경으로 옮긴 후 실행하면 폐쇄망 내 구축한 registry에 이미지들을 push할 수 있다. image-load.sh은 images 디렉토리와 같은 경로에서 실행해야만 한다.
$ chmod +x ./image-load.sh
$ ./image-load.sh ${REGISTRY_ADDRESS}
$ curl -X GET ${REGISTRY_ADDRESS}/v2/_catalog
- image-save.sh을 실행하면 설치에 필요한 이미지들을 pull 받아서 images 디렉토리에 tar 파일로 저장한다.
- Yaml 파일 및 script 파일 준비
- 아래 명령어를 수행하여 Kubeflow 설치에 필요한 yaml 파일들과 script 파일들을 다운로드 받는다.
$ wget https://raw.githubusercontent.com/tmax-cloud/install-ai-devops/5.0/sed.sh
$ wget https://raw.githubusercontent.com/tmax-cloud/install-ai-devops/5.0/kustomize_local.tar.gz
$ wget https://raw.githubusercontent.com/tmax-cloud/install-ai-devops/5.0/crd-for-hypercloud.tar.gz
$ wget https://raw.githubusercontent.com/tmax-cloud/install-ai-devops/5.0/structural_schema.sh
$ wget https://raw.githubusercontent.com/tmax-cloud/install-ai-devops/5.0/structural_schema_ko-en.sh
$ wget https://raw.githubusercontent.com/tmax-cloud/install-ai-devops/5.0/kfDef-hypercloud_local.yaml
$ wget https://github.com/kubeflow/kfctl/releases/download/v1.2.0/kfctl_v1.2.0-0-gbc038f9_linux.tar.gz
- 아래 명령어를 수행하여 Kubeflow 설치에 필요한 yaml 파일들과 script 파일들을 다운로드 받는다.
- 앞으로의 진행
- Step 0 ~ 6 중 Step 0, 2, 3, 5, 6은 비고를 참고하여 진행한다. 나머지는 그대로 진행하면 된다.
- 목적 :
Kubeflow component를 배포 및 관리하기 위한 커맨드 라인툴인 kfctl을 설치한다. - 생성 순서 : 아래 명령어를 수행하여 kfctl을 설치한다.
$ wget https://github.com/kubeflow/kfctl/releases/download/v1.2.0/kfctl_v1.2.0-0-gbc038f9_linux.tar.gz
$ tar xzvf kfctl_v1.2.0-0-gbc038f9_linux.tar.gz
$ sudo mv kfctl /usr/bin
- 비고 :
- 폐쇄망 환경일 경우 kfctl_v1.2.0-0-gbc038f9_linux.tar.gz을 github에서 받는 것이 아니라 미리 다운로드 해둔 것을 사용하면 된다.
- 목적 :
Kubeflow의 설치 yaml이 저장될 설치 디렉토리를 생성하고 해당 경로로 이동한다. - 생성 순서 :
- 아래 명령어를 수행하여 설치 디렉토리를 생성하고 해당 경로로 이동한다.
$ export KF_NAME=kubeflow
$ export BASE_DIR=/home/${USER}
$ export KF_DIR=${BASE_DIR}/${KF_NAME}
$ mkdir -p ${KF_DIR}
$ cd ${KF_DIR}
- ${KF_DIR}이 설치 디렉토리이며 ${KF_NAME}, ${BASE_DIR}은 임의로 변경 가능하다.
- 아래 명령어를 수행하여 설치 디렉토리를 생성하고 해당 경로로 이동한다.
- 목적 :
Kubeflow는 Kubernetes 리소스 배포 툴인 Kustomize를 통해 설치된다. 이를 위해 Kubeflow를 설치하는 Kustomize 리소스를 생성한다. - 생성 순서 :
- 아래 명령어를 수행하여 Kustomize 리소스를 생성한다.
$ export CONFIG_URI="https://raw.githubusercontent.com/tmax-cloud/kubeflow-manifests/ai_devops.v1.2.5.0/kfDef-hypercloud.yaml"
$ kfctl build -V -f ${CONFIG_URI}
- 정상적으로 완료되면 kustomize라는 디렉토리가 생성된다.
- 아래 명령어를 수행하여 Kustomize 리소스를 생성한다.
- 비고 :
- 폐쇄망 환경일 경우 설치 디렉토리 ${KF_DIR}에 미리 다운로드받은 sed.sh, kustomize_local.tar.gz 파일을 옮긴다.
- 아래 명령어를 통해 Kustomize 리소스의 압축을 풀고 yaml 파일들에서 이미지들을 pull 받을 registry를 바꿔준다.
- 그 후 registry를 바꿔준 kustomize 리소스를 tar.gz 형식으로 재압축한다.
- 비고
- 다음단계인 hyperauth 연동을 진행할 예정이라면 아래 명령어 중 3번째까지만 실행하고 다음 단계로 넘어간다.
$ tar xvfz kustomize_local.tar.gz
$ chmod +x ./sed.sh
$ ./sed.sh ${REGISTRY_ADDRESS} ${KF_DIR}/kustomize
$ tar -zcvf kustomize_local.tar.gz ${KF_DIR}/kustomize
- 비고
- 목적 :
Notebook과 Hyperauth 연동을 통해 OIDC 인증관리를 적용한다. - 생성 순서 :
- HyperAuth에서 Client를 생성하고 관련 설정을 진행한다. Client가 이미 생성되어있는 경우에는 생성단계를 건너뛰고 config 수정 단계부터 진행한다.
- hyperauth에서 client 생성
- Client ID = notebook-gatekeeper
- Client protocol = openid-connect
- Access type = confidential
- Valid Redirect URIs: '*'
- Client > notebook-gatekeeper > Credentials > client_secret 확인
- Client > notebook-gatekeeper > Roles > add role로 'notebook-gatekeeper-manager' role 생성
- Client > notebook-gatekeeper > Mappers > create로 mapper 생성
- Name = notebook-gatekeeper
- Mapper Type = Audience
- Included Client Audience = notebook-gatekeeper
- notebook을 사용하고자 하는 사용자의 계정의 Role Mappings 설정에서 notebook-gatekeeper-manager Client role을 할당한다.
- hyperauth에서 client 생성
- config 수정) 아래의 command를 수정하여 환경에 맞는 config 정보에 맞게 수정한다.
- 비고
- CLIENT_SECRET = 위의 단계에서 확인한 notebook-gatekeeper 클라이언트의 시크릿 값
- DISCOVERY_URL = https://{{HyperAuth_URL}}/auth/realms/tmax
- {{HyperAuth_URL}} 부분에 환경에 맞는 하이퍼어쓰 주소를 입력한다.
- CUSTOM_DOMAIN = 인그레스로 접근할수 있도록 환경에 맞는 커스텀 도메인 주소를 입력한다. EX) tmaxcloud.org
$ export CLIENT_SECRET=client-secret
$ sed -i 's/{CLIENT_SECRET}/'${CLIENT_SECRET}'/g' ${KF_DIR}/.cache/manifests/kubeflow-manifests-ai_devops.v1.2.5.0/jupyter/notebook-controller/base/params.env
$ export DISCOVERY_URL=https://{{HyperAuth_URL}}/auth/realms/tmax
$ sed -i 's/{DISCOVERY_URL}/'${DISCOVERY_URL}'/g' ${KF_DIR}/.cache/manifests/kubeflow-manifests-ai_devops.v1.2.5.0/jupyter/notebook-controller/base/params.env
$ export CUSTOM_DOMAIN=tmaxcloud.org
$ sed -i 's/{CLIENT_SECRET}/'${CLIENT_SECRET}'/g' ${KF_DIR}/.cache/manifests/kubeflow-manifests-ai_devops.v1.2.5.0/jupyter/notebook-controller/base/params.env
- 비고
- HyperAuth에서 Client를 생성하고 관련 설정을 진행한다. Client가 이미 생성되어있는 경우에는 생성단계를 건너뛰고 config 수정 단계부터 진행한다.
- 비고 :
- 폐쇄망 환경일 경우 위 단계에서 registry를 바꿔준 상태
- 아래 명령어를 통해 notebook-controlller의 parameter 값들을 환경에 맞게 수정한다.
- 그 후 registry를 바꿔준 kustomize 리소스를 tar.gz 형식으로 재압축한다.
$ export CLIENT_SECRET=client-secret
$ sed -i 's/{CLIENT_SECRET}/'${CLIENT_SECRET}'/g' ${KF_DIR}/kustomize/jupyter/notebook-controller/base/params.env
$ export DISCOVERY_URL=https://{{HyperAuth_URL}}/auth/realms/tmax
$ sed -i 's/{DISCOVERY_URL}/'${DISCOVERY_URL}'/g' ${KF_DIR}/kustomize/jupyter/notebook-controller/base/params.env
$ export CUSTOM_DOMAIN=tmaxcloud.org
$ sed -i 's/{CLIENT_SECRET}/'${CLIENT_SECRET}'/g' ${KF_DIR}/kustomize/jupyter/notebook-controller/base/params.env
$ tar -zcvf kustomize_local.tar.gz ${KF_DIR}/kustomize
- 목적 :
Kustomize 리소스를 apply하여 Kubeflow를 배포한다. - 생성 순서 :
- 아래 명령어를 수행하여 Kubeflow를 배포한다.
$ export CONFIG_FILE=${KF_DIR}/kfDef-hypercloud.yaml
$ kfctl apply -V -f ${CONFIG_FILE}
- 설치에는 약 10분 정도가 소요된다.
- 아래 명령어를 수행하여 Kubeflow를 배포한다.
- 비고 :
- 폐쇄망 환경일 경우 설치 디렉토리 ${KF_DIR}에 미리 다운로드받은 kfDef-hypercloud_local.yaml 파일을 옮긴다.
- 아래 명령어를 수행하여 kfDef-hypercloud_local.yaml 파일의 repo를 이전 단계에서 압축한 kustomize_local.tar.gz 파일의 경로로 변경한다.
- 아래 명령어를 수행하여 Kubeflow를 배포한다.
$ export CONFIG_FILE=${KF_DIR}/kfDef-hypercloud_local.yaml
$ export LOCAL_REPO=${KF_DIR}/kustomize_local.tar.gz
$ sed -i 's/{local_repo}/'${LOCAL_REPO}'/g' ${CONFIG_FILE}
$ kfctl apply -V -f ${CONFIG_FILE}
- 목적 :
Kubeflow 배포를 확인하고 문제가 있을 경우 정상화한다. - 생성 순서 :
- 아래 명령어를 수행하여 kubeflow namespace의 모든 pod가 정상적인지 확인한다.
$ kubectl get pod -n kubeflow
- katib-db-manager와 katib-mysql pod만 running 상태가 아니라면 10분가량 시간을 두고 기다리면 running 상태도 바뀔 가능성이 높음 (내부 liveness probe 로직 문제로 여러번 restarts)
- 아래 명령어를 수행하여 kubeflow namespace의 모든 pod가 정상적인지 확인한다.
- 참고 :
- KFServing과 Istio 1.5.1과의 호환을 위해 istio namespace의 mtls를 disable처리 하였음.
- 목적 :
Hypercloud Console의 form editor기능과 다국어 지원을 위해 Structural Schema를 적용한다. - 생성 순서 :
- form editor 사용을 원한다면 아래 명령어를 수행하여 기존 crd를 삭제하고 새로운 crd schema를 create 한다.
$ chmod +x structural_schema.sh
$ ./structural_schema.sh
- 다국어 지원을 원한다면 위 명령어 대신 아래 명령어를 수행하여 crd를 삭제 후 create한다.
$ chmod +x structural_schema_ko-en.sh
$ ./structural_schema_ko-en.sh
- form editor 사용을 원한다면 아래 명령어를 수행하여 기존 crd를 삭제하고 새로운 crd schema를 create 한다.
- 비고 :
- 폐쇄망 환경일 경우 설치 디렉토리 ${KF_DIR}에 미리 다운로드받은 structural_schema.sh, structural_schema_ko-en.sh, crd-for-hypercloud.tar.gz 파일을 옮긴다.
- 아래 명령어를 통해 CRD 스키마의 압축을 풀고 스크립트를 실행하여 structural schema를 적용한다.
$ tar -zxvf crd-for-hypercloud.tar.gz
$ chmod +x structural_schema.sh
$ chmod +x structural_schema_ko-en.sh
- form-editor 사용을 원하는 경우
$ ./structural_schema.sh
- 다국어 지원을 원하는 경우
$ ./structural_schema_ko-en.sh
- 목적 :
kubeflow 설치 시에 배포된 모든 리소스를 삭제 한다. - 생성 순서 :
- 아래 명령어를 수행하여 kubeflow 모듈을 삭제한다.
$ export CONFIG_URI="https://raw.githubusercontent.com/tmax-cloud/kubeflow-manifests/ai_devops.v1.2.5.0/kfDef-hypercloud.yaml"
$ kfctl delete -V -f ${CONFIG_URI}
- 아래 명령어를 수행하여 kubeflow 모듈을 삭제한다.
- 비고 :
-
kfctl 1.1버전 이상부터 리소스의 삭제가 정상적으로 이루어진다. kfctl 버전은 다음명령어를 통해 확인할 수 있다.
$ kfctl version
-
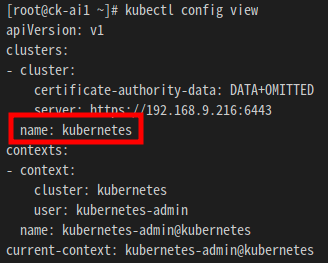
cluster name doesn"t match 라는 에러가 발생한다면 다음 명령어를 통해 clusterName을 확인하고 kfdef-hypercloud.yaml에 필드를 추가한다.
$ kubectl config view

-
| Namespace | Pod | Container 수 | Container | Container image | Request | Limit | ||
|---|---|---|---|---|---|---|---|---|
| cpu | memory | cpu | memory | |||||
| istio-system | cluster-local-gateway | 1 | istio-proxy | istio/proxyv2:1.3.1 | 10m | 40Mi | 1 | 128Mi |
| kubeflow | application-controller | 1 | manager | gcr.io/kubeflow-images-public/kubernetes-sigs/application:1.0-beta | 70m | 200Mi | 1 | 2Gi |
| katib-controller | 1 | katib-controller | docker.io/kubeflowkatib/katib-controller:v0.11.0 | 30m | 400Mi | 1 | 4Gi | |
| katib-db-manager | 1 | katib-db-manager | docker.io/kubeflowkatib/katib-db-manager:v0.11.0 | 20m | 100Mi | 1 | 2Gi | |
| katib-mysql | 1 | katib-mysql | mysql:8.0.27 | 1 | 2Gi | 1 | 4Gi | |
| katib-ui | 1 | katib-ui | docker.io/kubeflowkatib/katib-ui:v0.11.0 | 20m | 100Mi | 1 | 1Gi | |
| kfserving-controller-manager | 2 | manager | gcr.io/kfserving/kfserving-controller:v0.5.1 | 100m | 200Mi | 100m | 300Mi | |
| kube-rbac-proxy | gcr.io/kubebuilder/kube-rbac-proxy:v0.4.0 | 10m | 40Mi | 1 | 400Mi | |||
| minio | 1 | minio | gcr.io/ml-pipeline/minio:RELEASE.2019-08-14T20-37-41Z-license-compliance | 20m | 100Mi | 1 | 1Gi | |
| notebook-controller-deployment | 1 | notebook-controller | tmaxcloudck/notebook-controller-go:b0.1.0 | 20m | 300Mi | 1 | 3Gi | |
| profiles-deployment | 2 | manager | gcr.io/kubeflow-images-public/profile-controller:vmaster-ga49f658f | 20m | 250Mi | 1 | 2.5Gi | |
| kfam | gcr.io/kubeflow-images-public/kfam:vmaster-g9f3bfd00 | 20m | 250Mi | 1 | 2.5Gi | |||
| pytorch-operator | 1 | pytorch-operator | gcr.io/kubeflow-images-public/pytorch-operator:vmaster-g518f9c76 | 20m | 150Mi | 1 | 1.5Gi | |
| tf-job-operator | 1 | tf-job-operator | gcr.io/kubeflow-images-public/tf_operator:vmaster-gda226016 | 20m | 150Mi | 1 | 1.5Gi | |
| knative-serving | activator | 1 | activator | gcr.io/knative-releases/knative.dev/serving/cmd/activator:v0.14.3 | 300m | 60Mi | 1000m | 600Mi |
| autoscaler | 1 | autoscaler | gcr.io/knative-releases/knative.dev/serving/cmd/autoscaler:v0.14.3 | 30m | 40Mi | 300m | 400Mi | |
| istio-webhook | 1 | webhook | gcr.io/knative-releases/knative.dev/net-istio/cmd/webhook:v0.14.1 | 20m | 20Mi | 200m | 200Mi | |
| controller | 1 | controller | gcr.io/knative-releases/knative.dev/serving/cmd/controller:v0.14.3 | 100m | 100Mi | 1 | 1000Mi | |
| networking-istio | 1 | networking-istio | gcr.io/knative-releases/knative.dev/net-istio/cmd/controller:v0.14.1 | 30m | 40Mi | 300 | 400Mi | |
| webhook | 1 | webhook | gcr.io/knative-releases/knative.dev/serving/cmd/webhook:v0.14.3 | 20m | 20Mi | 200m | 200Mi |