Setup
If you arrived here for the first time, welcome! We're very happy to see yet another radio enthusiast that is interested in this project, although bear in mind that with great power comes great responsibility. BotWave is capable of doing a lot of different FM-related tasks, but only as long as you care enough to learn how to use it. Indeed, reading wiki, following our guidelines and learning more about various FM/Radio concepts will help you to use this tool correctly.
We recommend you to do one thing at a time. BotWave can be a bit complex to use and understand at first glance. You don't need to understand or read about everything at once, and we actually recommend you to take it easy. Relax, pick yourself a beverage of choice, dedicate 30 minutes of your time and dive into our lecture - we can promise that it'll be well worth your time.
Let's start from the basics - BotWave is a console app in its principle, which means that it won't spawn a graphical interface that you're in general used to. One of its main use cases considers running on the server machines, which desktop apps are entirely unsuitable for. In most of your use cases, you will be put in front of a command line prompt, like botwave > - don't panic, its absolutely normal!
That will do for now, let's start!
We will now see how to automatically install every component and after that how to get them to work together. Please read everything carefully to be sure not to skip any important step.
BotWave comes with 3 different installation modes, served by our install script. Here is a table with what you need to know about them.
| Mode | Purpose | Components Installed | Typical Use Case |
|---|---|---|---|
| client | Broadcasting nodes |
CU, SI, Shared utilities, Backends |
Raspberry Pi devices that will perform FM broadcasting |
| server | Central management |
SU, Shared utilities |
Management machine that controls multiple clients |
| both | Hybrid deployment | All components | Single-device development or combined server-client node |
Please note that our install script only supports Debian-based Linux distributions. If you're on a different operating system, please check the Manual Installation guide.
BotWave has an automatic installation script for Debian-based Linux distributions. The best way of using it, is to run this command in a terminal:
curl -sSL https://botwave.dpip.lol/install | sudo bash -s <component> # this requires cURL to be installedPlease note that this requires sudo (administrator / root) access.
Alternatively, if you don't want to use our services, for privacy or unavailability reasons, you can either directly download the file from the GitHub repo: install.sh, or directly replace [...]botwave.dpip.lol[...] with https://raw.githubusercontent.com/dpipstudio/botwave/refs/heads/main/scripts/install.sh in the install url.
In this part, we'll install the SU and CU, and check if they work together correctly.
Let’s begin with installing the Server Unit (SU).
First of all, connect to your Linux server machine, and run the install command, by replacing <component> with server.
Expected result
[dpip@botwave-server] ~ › curl -sSL https://botwave.dpip.lol/install | sudo bash -s server
[16:32:42] INFO  Mode selected: server
[16:32:42] INFO  Installing system dependencies...
184 packages can be upgraded. Run 'apt list --upgradable' to see them.
python3 is already the newest version (3.11.2-1+b1).
python3-pip is already the newest version (23.0.1+dfsg-1).
python3-venv is already the newest version (3.11.2-1+b1).
libsndfile1-dev is already the newest version (1.2.0-1+deb12u1).
make is already the newest version (4.3-4.1).
ffmpeg is already the newest version (7:5.1.7-0+deb12u1).
git is already the newest version (1:2.39.5-0+deb12u2).
curl is already the newest version (7.88.1-10+deb12u14).
jq is already the newest version (1.6-2.1+deb12u1).
0 upgraded, 0 newly installed, 0 to remove and 184 not upgraded.
[16:32:52] INFO  Creating install directories...
[16:32:52] INFO  Creating Python virtual environment...
[16:32:55] INFO  Updating PIP in the virtual environment...
[16:32:57] INFO  Fetching installation configuration...
[16:32:58] INFO  Processing : server
[16:32:58] INFO  Downloading files for : server
[16:32:58] INFO    - Downloading server/server.py...
[16:32:58] INFO    - Downloading shared/tls.py...
[16:32:58] INFO  Installing Python requirements for : server
[16:32:58] INFO    - Installing cryptography==36.0.2...
[16:32:59] INFO  Installing binaries for : server
[16:32:59] INFO    - Downloading bin/bw-server...
[16:33:00] INFO  Symlink created: /usr/local/bin/bw-server -> /opt/BotWave/bin/bw-server
[16:33:00] INFO  Processing : always
[16:33:00] INFO  Downloading files for : always
[16:33:00] INFO    - Downloading autorun/autorun.py...
[16:33:00] INFO    - Downloading shared/handlers.py...
[16:33:00] INFO    - Downloading shared/http.py...
[16:33:00] INFO    - Downloading shared/logger.py...
[16:33:00] INFO    - Downloading shared/protocol.py...
[16:33:01] INFO    - Downloading shared/socket.py...
[16:33:01] INFO    - Downloading shared/sstv.py...
[16:33:01] INFO    - Downloading shared/syscheck.py...
[16:33:01] INFO    - Downloading shared/version.py...
[16:33:02] INFO    - Downloading shared/ws_cmd.py...
[16:33:02] INFO  Installing Python requirements for : always
[16:33:02] INFO    - Installing websockets==11.0.3...
[16:33:02] INFO    - Installing dlogger==1.0.2...
[16:33:03] INFO    - Installing aiofiles==0.8.0...
[16:33:04] INFO    - Installing aiohttp...
[16:33:06] INFO  Installing binaries for : always
[16:33:06] INFO    - Downloading bin/bw-autorun...
[16:33:06] INFO  Symlink created: /usr/local/bin/bw-autorun -> /opt/BotWave/bin/bw-autorun
[16:33:06] INFO    - Downloading bin/bw-nandl...
[16:33:06] INFO  Symlink created: /usr/local/bin/bw-nandl -> /opt/BotWave/bin/bw-nandl
[16:33:06] INFO    - Downloading bin/bw-update...
[16:33:07] INFO  Symlink created: /usr/local/bin/bw-update -> /opt/BotWave/bin/bw-update
[16:33:07] INFO  Retrieving last commit...
[16:33:07] INFO  Installation complete.
[16:33:07] INFO  Installed components:
[16:33:07] INFO    - Server mode
[16:33:07] INFO    - Common utilities
[dpip@botwave-server] ~ ›
We now should be able to run the SU on our machine. Try running bw-server: a command prompt should appear after some startup logs.
Expected result
[dpip@botwave-server] ~ › bw-server
BotWave - Server
[TLS] Generated self-signed TLS certificate
[SERVER] WebSocket server started on wss://0.0.0.0:9938
[SERVER] HTTP file server started on https://0.0.0.0:9921
[SERVER] BotWave Server started
[VER] Protocol Version: 2.0.0
[INFO] Checking for protocol updates...
[OK] You are using the latest protocol version
Type 'help' for commands
botwave ›
Now that the server is running, let’s install the client.
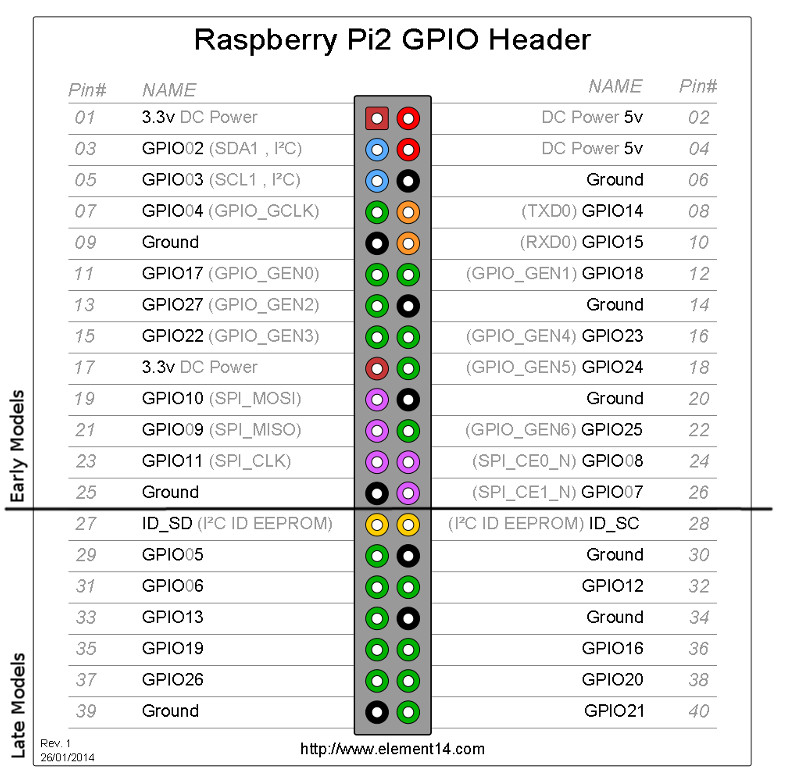
First of all, please note that by plugging a wire (25-50cm) into the GPIO 4 of your raspberry pi, you will be able to extend the range of the signal and stabilize it.
Example images
Raspberry Pi GPIO Layout (same for every supported rpis):
Example on a pi 3:

The installation process is very similar, but instead of replacing <component> with server, we'll replace it with client. Please note that this process might be a bit longer since there are more things to install. It'll also depend on the performance of your Raspberry Pi.
Expected result
[dpip@botwave-client] ~ › curl -sSL https://botwave.dpip.lol/install | sudo bash -s client
[19:42:38] INFO  Mode selected: client
[19:42:38] INFO  Installing system dependencies...
141 packages can be upgraded. Run 'apt list --upgradable' to see them.
python3 is already the newest version (3.13.5-1).
python3-pip is already the newest version (25.1.1+dfsg-1).
python3-venv is already the newest version (3.13.5-1).
libsndfile1-dev is already the newest version (1.2.2-2+b1).
make is already the newest version (4.4.1-2).
ffmpeg is already the newest version (8:7.1.2-0+deb13u1+rpt2).
git is already the newest version (1:2.47.3-0+deb13u1).
jq is already the newest version (1.7.1-6+deb13u1).
Upgrading:
curl  libcurl3t64-gnutls  libcurl4t64
Summary:
Upgrading: 3, Installing: 0, Removing: 0, Not Upgrading: 138
Download size: 975 kB
Space needed: 0 B / 681 MB available
apt-listchanges: Reading changelogs...
(Reading database ... 120635 files and directories currently installed.)
Preparing to unpack .../curl_8.14.1-2+deb13u2_arm64.deb ...
Unpacking curl (8.14.1-2+deb13u2) over (8.14.1-2) ...
Preparing to unpack .../libcurl4t64_8.14.1-2+deb13u2_arm64.deb ...
Unpacking libcurl4t64:arm64 (8.14.1-2+deb13u2) over (8.14.1-2) ...
Preparing to unpack .../libcurl3t64-gnutls_8.14.1-2+deb13u2_arm64.deb ...
Unpacking libcurl3t64-gnutls:arm64 (8.14.1-2+deb13u2) over (8.14.1-2) ...
Setting up libcurl4t64:arm64 (8.14.1-2+deb13u2) ...
Setting up libcurl3t64-gnutls:arm64 (8.14.1-2+deb13u2) ...
Setting up curl (8.14.1-2+deb13u2) ...
Processing triggers for man-db (2.13.1-1) ...
Processing triggers for libc-bin (2.41-12+rpt1) ...
[19:43:15] INFO  Creating install directories...
[19:43:15] INFO  Creating Python virtual environment...
[19:43:31] INFO  Updating PIP in the virtual environment...
[19:43:40] INFO  Fetching installation configuration...
[19:43:40] INFO  Installing backends...
[19:43:40] INFO    - Processing backend: bw_custom
[19:43:40] INFO      Cloning bw_custom...
[19:43:42] INFO      Building bw_custom...
[19:43:48] INFO      Successfully built bw_custom
[19:43:48] INFO  Processing : client
[19:43:48] INFO  Downloading files for : client
[19:43:48] INFO    - Downloading client/client.py...
[19:43:48] INFO    - Downloading local/local.py...
[19:43:48] INFO    - Downloading shared/bw_custom.py...
[19:43:49] INFO    - Downloading shared/pw_monitor.py...
[19:43:49] INFO  Installing Python requirements for : client
[19:43:49] INFO    - Installing piwave==2.1.8...
[19:43:53] INFO  Installing binaries for : client
[19:43:53] INFO    - Downloading bin/bw-client...
[19:43:53] INFO  Symlink created: /usr/local/bin/bw-client -> /opt/BotWave/bin/bw-client
[19:43:53] INFO    - Downloading bin/bw-local...
[19:43:54] INFO  Symlink created: /usr/local/bin/bw-local -> /opt/BotWave/bin/bw-local
[19:43:54] INFO  Processing : always
[19:43:54] INFO  Downloading files for : always
[19:43:54] INFO    - Downloading autorun/autorun.py...
[19:43:54] INFO    - Downloading shared/handlers.py...
[19:43:54] INFO    - Downloading shared/http.py...
[19:43:55] INFO    - Downloading shared/logger.py...
[19:43:55] INFO    - Downloading shared/protocol.py...
[19:43:56] INFO    - Downloading shared/socket.py...
[19:43:56] INFO    - Downloading shared/sstv.py...
[19:43:56] INFO    - Downloading shared/syscheck.py...
[19:43:57] INFO    - Downloading shared/version.py...
[19:43:57] INFO    - Downloading shared/ws_cmd.py...
[19:43:57] INFO  Installing Python requirements for : always
[19:43:58] INFO    - Installing websockets==11.0.3...
[19:44:01] INFO    - Installing dlogger==1.0.2...
[19:44:03] INFO    - Installing aiofiles==0.8.0...
[19:44:06] INFO    - Installing aiohttp...
[19:44:22] INFO  Installing binaries for : always
[19:44:22] INFO    - Downloading bin/bw-autorun...
[19:44:22] INFO  Symlink created: /usr/local/bin/bw-autorun -> /opt/BotWave/bin/bw-autorun
[19:44:22] INFO    - Downloading bin/bw-nandl...
[19:44:22] INFO  Symlink created: /usr/local/bin/bw-nandl -> /opt/BotWave/bin/bw-nandl
[19:44:22] INFO    - Downloading bin/bw-update...
[19:44:23] INFO  Symlink created: /usr/local/bin/bw-update -> /opt/BotWave/bin/bw-update
[19:44:23] INFO  Retrieving last commit...
[19:44:23] INFO  Installation complete.
[19:44:23] INFO  Installed components:
[19:44:23] INFO    - Client mode
[19:44:23] INFO    - Common utilities
[dpip@botwave-client] ~ ›
If the installation process ended being successful, try running sudo bw-local (administrator rights are required to access the pi hardware). If everything goes well it should ask you for a server to connect to.
Expected result
[dpip@botwave-client] ~ › sudo bw-client
BotWave - Client
Server hostname/IP:
If both client and server are working as expected, let's try to connect them together. For this please be sure to have bw-server running on your server machine. Then note down the IP address or hostname of the same machine.
How do I know my server's hostname / IP address ?
To connect to your server, you'll need to know its 'location' on the internet or in your local network. There are two different situations regarding this. The first is if your server machine and client (Raspberry Pi) are on the same network (e.g., connected to the same WiFi). The other one is if your server machine is somewhere else on the internet, e.g. by using a VPS.
If your server and client are on the same network, go on your server machine, where there should be a botwave > prompt. If not, launch BotWave server with the bw-server command.
Then, run this command in the BotWave prompt:
< echo "Local Host: $(hostname).local, Local IP: $(hostname -I | awk '{print $1}')"
It should return something like: Local Host: botwave-client.local, Local IP: 192.168.1.69. Please note down these values. If possible, prefer using the IP rather than the hostname, since it's more reliable.
If your server and client aren't on the same network, first of all be sure that the default 9938 and 9921 are accessible by the internet. This may be achievable by configuring your server firewall or your router port forwarding settings. If you're not sure about what you're doing, ask an LLM or search on the internet. Example with ChatGPT
Then, run this command in the BotWave prompt:
< echo "FQDN: $(hostname -f), Public IP: $(curl -s4 https://ifconfig.me)"
It should return something like: FQDN: botwave.dpip.lol, Public IP: 1.1.1.1. Please note down these values. If possible, prefer using the IP rather than the hostname, since it's more reliable.
Once you got your server hostname / IP address, launch the client with sudo bw-client on your client machine. You can either directly add the server address after the command, like this sudo bw-client x.x.x.x or just write it in the input once the client launched.
If your inputs are correct, you should see this in your client terminal:
BotWave - Client

[OK] Found bw_custom at: /opt/BotWave/backends/bw_custom/src/bw_custom
[INFO] Checking for protocol updates...
[OK] You are using the latest protocol version
[CLIENT] Connecting to wss://192.168.1.69:9938...
[OK] WebSocket connected, registering...
[OK] Registered as: botwave-client_192.168.1.96
And this in your server terminal:
[INFO] Registration attempt from botwave-client
[OK] Client registered: botwave-client (botwave-client_192.168.1.96)
That’s it: your BotWave setup is now ready to use.
You can now check the Main/Basic Usage page to see some basic usage examples.
If you want to contribute, suggest ideas, or get help, feel free to join the community and open discussions or issues.
Note
We haven't talked about local client in this basic setup, because it is very similar to the server, except it also comes with the client backend. That means that its meant to run on a supported Raspberry Pi, and can directly execute commands without having a master server.