A simple multi-user web application demonstrating the use of AWS serverless to interact with OpenAI Assistant API, via a simple web chat interface with streaming output.
Both backend and frontend are implemented with TypeScript.

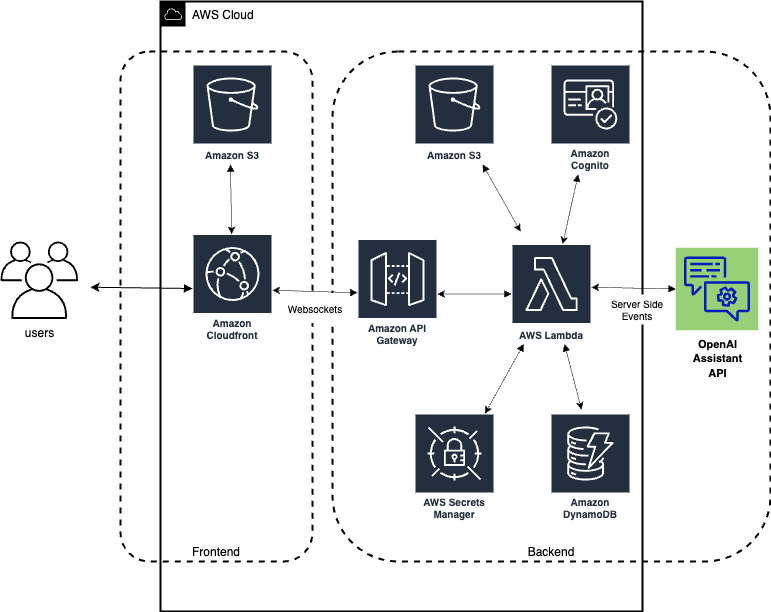
The architecture of the application is illustrated below:
- Set the filled-in
BACKENDenvironment variables with your own values.- Bucket names are globally unique, so you will at least need to update these.
I use a .env file with direnv. Otherwise prefix these with "export" and execute in your shell.
# .env
# BACKEND
REGION=us-east-1
STACK_NAME=serverless-assistant-chat
BE_DEPLOYMENT_BUCKET=serverless-assistant-chat
FE_DEPLOYMENT_BUCKET=serverless-assistant-chat-fe
USER_EMAIL=you@example.com
OPENAI_API_KEY=youropenaikeyvalue
OPENAI_API_KEY_NAME=OpenAIAPIKey
OPENAI_SECRET_ARN=arn:aws:secretsmanager:yourregion:youraccount:secret:OpenAIAPIKey-xxxxx
ASSISTANT_ID=

# FRONTEND
USER_POOL_ID=
USER_POOL_WEB_CLIENT_ID=
API_ENDPOINT=wss://xxxxxxxx.execute-api.us-east-1.amazonaws.com/dev
DOMAIN_NAME=
DISTRIBUTION_ID=Creating an Assistant instance is a one-time operation, but you can continue to modify it after creation. There are many methods but two are:
Create an Assistant instance using our python script. Create a Python 3.10+ venv and install the requirements.txt.
Optionally update the instructions field in assistant.yml.
Deploy it to OpenAI with:
make upsert-assistantOr, using the same account as your OPENAI_API_KEY you can roll your own and use the OpenAI Assistant API v2 to create an assistant instance.
Upon success you'll get an assistant ID. You'll need this.
- Update the
assistant.ymlfile and give theAssistantIdfield this value. This allows you to update the prompt and update the existing assistant instance. - add
ASSISTANT_ID=yourvalueto your environment (.env)
Before creating the insfrastructure via the Cloud Formation template, build the backend Lambda code and place it in S3 for the Lambda deployment by following the steps below
First we create an S3 bucket to hold the deployable Lambda code (remember S3 bucket names are globally unique).
make create-backend-bucketWe then transpile and webpack the backend Typescript code by running the following command
make build-backendFinally we build and deploy our Lambda code by running the following command
make deploy-backendWe don't want to expose our value of OPENAI_API_KEY outside our computer unless its encrypted.
Ensure its set in your environment then run this make target to upload it as an AWS secret. It will be used in our Lambda function.
make create-secretUpdate your .env file setting the OPENAI_SECRET_ARN value from the output from step.
We need to give our backend access to the OpenAI API.
We do this by creating a Lambda layer that contains the OpenAI NodeJS SDK and dependencies.
make prepare-layerWe have to deploy our Lambda layer to S3.
make create-layerOnce we have the Lambda artifact built and ready to be deployed, we can deploy the supplied Cloud Formation template that will create all the required infrastructure (Lambda, API Gateway, S3 bucket, CloudFront distro, Cognito items etc.)
make create-frontend-bucket- Install AWS SAM CLI (if not already installed):
- Follow the AWS SAM installation guide.
- Prepare the CloudFormation deployment:
make prepare-cf
- Deploy the CloudFormation deployment:
make deploy-cf
When the CloudFormation stack has successfully completed, in the outputs make note of the following parameters that you will need to add to the .env file before you build and deploy the frontend code.
Update the .env file with the following vars:
REGION,USER_POOL_ID,USER_POOL_WEB_CLIENT_ID,API_ENDPOINT,DOMAIN_NAME,DISTRIBUTION_ID
To build the frontend code, run the following command from the project root directory.
make build-frontendTo build and deploy the frontend, run the following command from the project root directory. The FE_DEPLOYMENT_BUCKET is the name of the bucket provided when deploying the CloudFormation template in the previous step.
make deploy-frontendCheck your email for a welcome email from Cognito with a temporary password.
Then you can navidate to the CloudFront domain that was created by the CloudFormation stack (DOMAIN_NAME), enter your email address and password and start to use the application.
Deploying front-end changes take effect immediately.
make deploy-frontendDeploying backend-end changes require a stack update to take effect.
make deploy-cf- AWS Serverless Application Model (SAM)
- AWS Lambda
- AWS API Gateway with Websockets
- AWS Secrets Manager
- OpenAI Assistant API
- OpenAI NodeJs SDK
Thanks to Greg Biegel for the original CF template.
This project is licensed under the MIT License. See the LICENSE file for more details.