A comprehensive vehicle security system featuring automated recording, motion tracking, and intelligent power management, powered by Raspberry Pi, OpenCV, and Python.
- Introduction
- Recording and Storage Management
- Motion Detection
- Motorized Tracking
- Ignition Detection
- Hardware & 3D Design
- Power System Architecture
This project evolved from a standard dashcam concept into a proactive security system. Using a Raspberry Pi and the OpenCV library, the system performs motion detection to monitor the vehicle while parked.
A standout feature is the integration of an SG90 servo motor, which allows the camera to physically rotate toward detected movement similar to a "Sentry Mode." When the ignition is detected, the system automatically transitions into a standard looped dashcam mode for driving.
The picamera library is used to capture video streams. Since the PiCamera class outputs raw H.264 data, the files must be wrapped in an MP4 container for compatibility with standard media players.
- Conversion Workflow: The system utilizes
subprocess.check_outputto triggerMP4Box, which converts files to.mp4and removes the original raw data. - Concurrency: To prevent recording gaps during the 2–3 minute conversion process of large 10-minute clips, the
multiprocessinglibrary handles video conversion in the background.
This registry tracks all saved videos, including filenames and paths. The preserve_storage() function references this file to prune the oldest footage once the storage threshold is reached.
To handle unexpected shutdowns (e.g., power loss), the system uses conversion_itinerary.json. Every new recording is logged here immediately. If a conversion completes successfully, the entry is removed. Upon startup, this function checks for any remaining entries and converts "leftover" raw files from previous sessions.
he libraries required for motion detection are picamera, imutils, and OpenCV.
- picamera: Gives us access to the camera module which is connected to the camera port of the Raspberry Pi.
- picamera.array: Contains the class
PiRGBArraywhich returns frames from the camera as arrays of RGB or BGR values. This array format is required to process the frames in OpenCV, which uses the BGR array format. - OpenCV and imutils: Contains a whole bunch of stuff that can be used to process frames.
The basic idea is to continuously capture frames from the camera in the form of BGR arrays and compare them to previously captured frames to see if there is a big enough difference, which would in ideal conditions indicate motion.
Here's a simplified explanation of how the comparison is done:
for capture in camera.capture_continuous(rawCapture, format='bgr', use_video_port=True):
  frame = capture.array
  frame = imutils.resize(frame, width=width)
  gray = cv2.cvtColor(frame, cv2.COLOR_BGR2GRAY)
  gray = cv2.GaussianBlur(gray, (21, 21), 0)
  if avg is None:
    avg = gray.copy().astype("float")
    rawCapture.truncate(0)
    continue
  cv2.accumulateWeighted(gray, avg, 0.5)
  frameDelta = cv2.absdiff(gray, cv2.convertScaleAbs(avg))
  thresh = cv2.threshold(frameDelta, 7, 255, cv2.THRESH_BINARY)[1]
  thresh = cv2.dilate(thresh, None, iterations=5)
  contours = cv2.findContours(thresh.copy(), cv2.RETR_EXTERNAL, cv2.CHAIN_APPROX_SIMPLE)
  contours = imutils.grab_contours(contours)
  contourX = 0
  contourXlen = 0
  for cnt in contours:
    if (cv2.contourArea(cnt) < 4000) or (cv2.contourArea(cnt) > 40000):
      continue
    (x, y, w, h) = cv2.boundingRect(cnt)
    contourX += x + w / 2
    contourXlen += 1
  if contourXlen != 0:
    contourX = contourX / contourXlen
    i = 0
    contourX = (contourX // 10) * 10
Each frame that is captured is processed through the following steps:
- Preprocessing: The frame is resized to have a width of 500 to reduce computational time. It is then changed to grayscale to further remove unnecessary data, and blurred to remove some noise that can interfere with detection.
- Initialization: The first frame captured is used to initialize the
avgvariable, which is to be the average of previous frames that new frames are compared to. - Background Subtraction: Used to determine the difference in frame arrays, which is performed by the
cv2.absdifffunction by simply taking the difference between the current frame and the average of the previous frames. - Contouring: The
cv2.findContoursandimutils.grab_contoursfunctions create and retrieve contours that bound the areas highlighted byframeDelta. - Targeting: The resulting contours are used with
cv2.boundingRectto determine the x coordinate of the centre of the contours, which are averaged for all contours and stored incontourX.contourXis now the value that can be used to determine how the servo motor responds.
Various additions are made to the above code in main.py to allow for recording, moving the motor, ignition detection, and stability.
One important change that is made is allowing the motion detection to pause while the motor is moving the camera, otherwise that movement is detected as motion. This is done by resetting the avg variable and determining the number of frames that have to be skipped from:
- The time it will take the motor to the new position.
- The frame rate of the camera.
The SG90 servo motor operates on a 0° to 180° range, controlled via Pulse Width Modulation (PWM). The relationship between the signal duty cycle and the desired angle is linear.
The duty cycle is calculated based on the motion's X-coordinate (
The camera’s 130° field of view is mapped to the 500 pixel frame width, ensuring the motor rotates accurately to center the detected object.
To prevent unpredictable servo behavior caused by resource sharing, the motor control logic is isolated in a separate script. main.py communicates with this script via subprocess calls and a shared motor_data.json file, which tracks the motor's current orientation.
The system distinguishes between "Parked Mode" and "Driving Mode" by monitoring the car's ignition state via the cigarette lighter port.
- Signal Regulation: Since the car provides 12V and the Raspberry Pi GPIO pins only support 3.3V, a DC step-down converter is used as a signal regulator.
- check_ignition(): This function polls the GPIO state. It also handles graceful shutdowns if the system has been running on battery power for a duration exceeding the safety threshold.
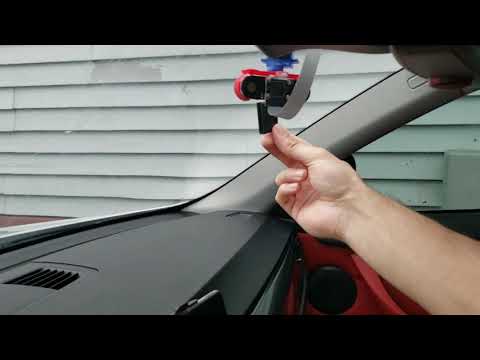
The motor somehow had to be attached to the camera, and both mounted to the windshield of the car. I decided the best option would be to 3D print a frame for the camera and motor that allowed the two to be easily attached and mounted to the windshield. The frame was designed in Autodesk Inventor; the print file is imaged below:

I went to a local library to get this printed and unfortunately didn't have much of a choice in color and had limited printing time. The printed frame attached to the camera and motor is imaged below:


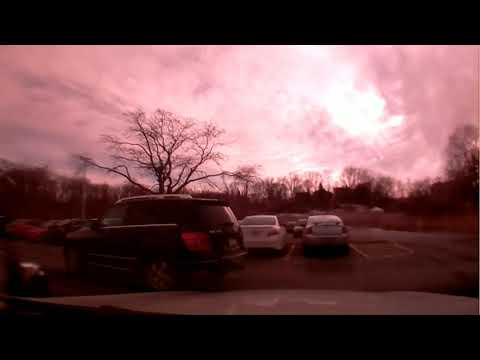
The two round housings on the side of the camera contain infra-red LEDs that allow the camera to see better at night, as the camera lacks an IR filter. The lack of an IR filter also adds a red tint to daylight shots, but that's the sacrifice made for night vision.
The system requires a seamless power transition when the engine starts or stops.
- Battery: A 20Ah battery bank provides approximately 12 hours of standby surveillance.
- Switching Logic: A relay circuit, supported by a 10mF capacitor, handles the handover between the battery and the car’s auxiliary power. The capacitor acts as a buffer to prevent the Pi from rebooting during the millisecond-long relay switch.
- Regulation: A DC-DC buck converter regulates the varying vehicle/battery voltage down to a stable 5V for the Raspberry Pi.

Camera motion detection demonstration:
Recording from sentry mode: