Advanced Deep Learning Framework for Automated Phenological Analysis of Close-Range Time-Lapse PhenoCam Data
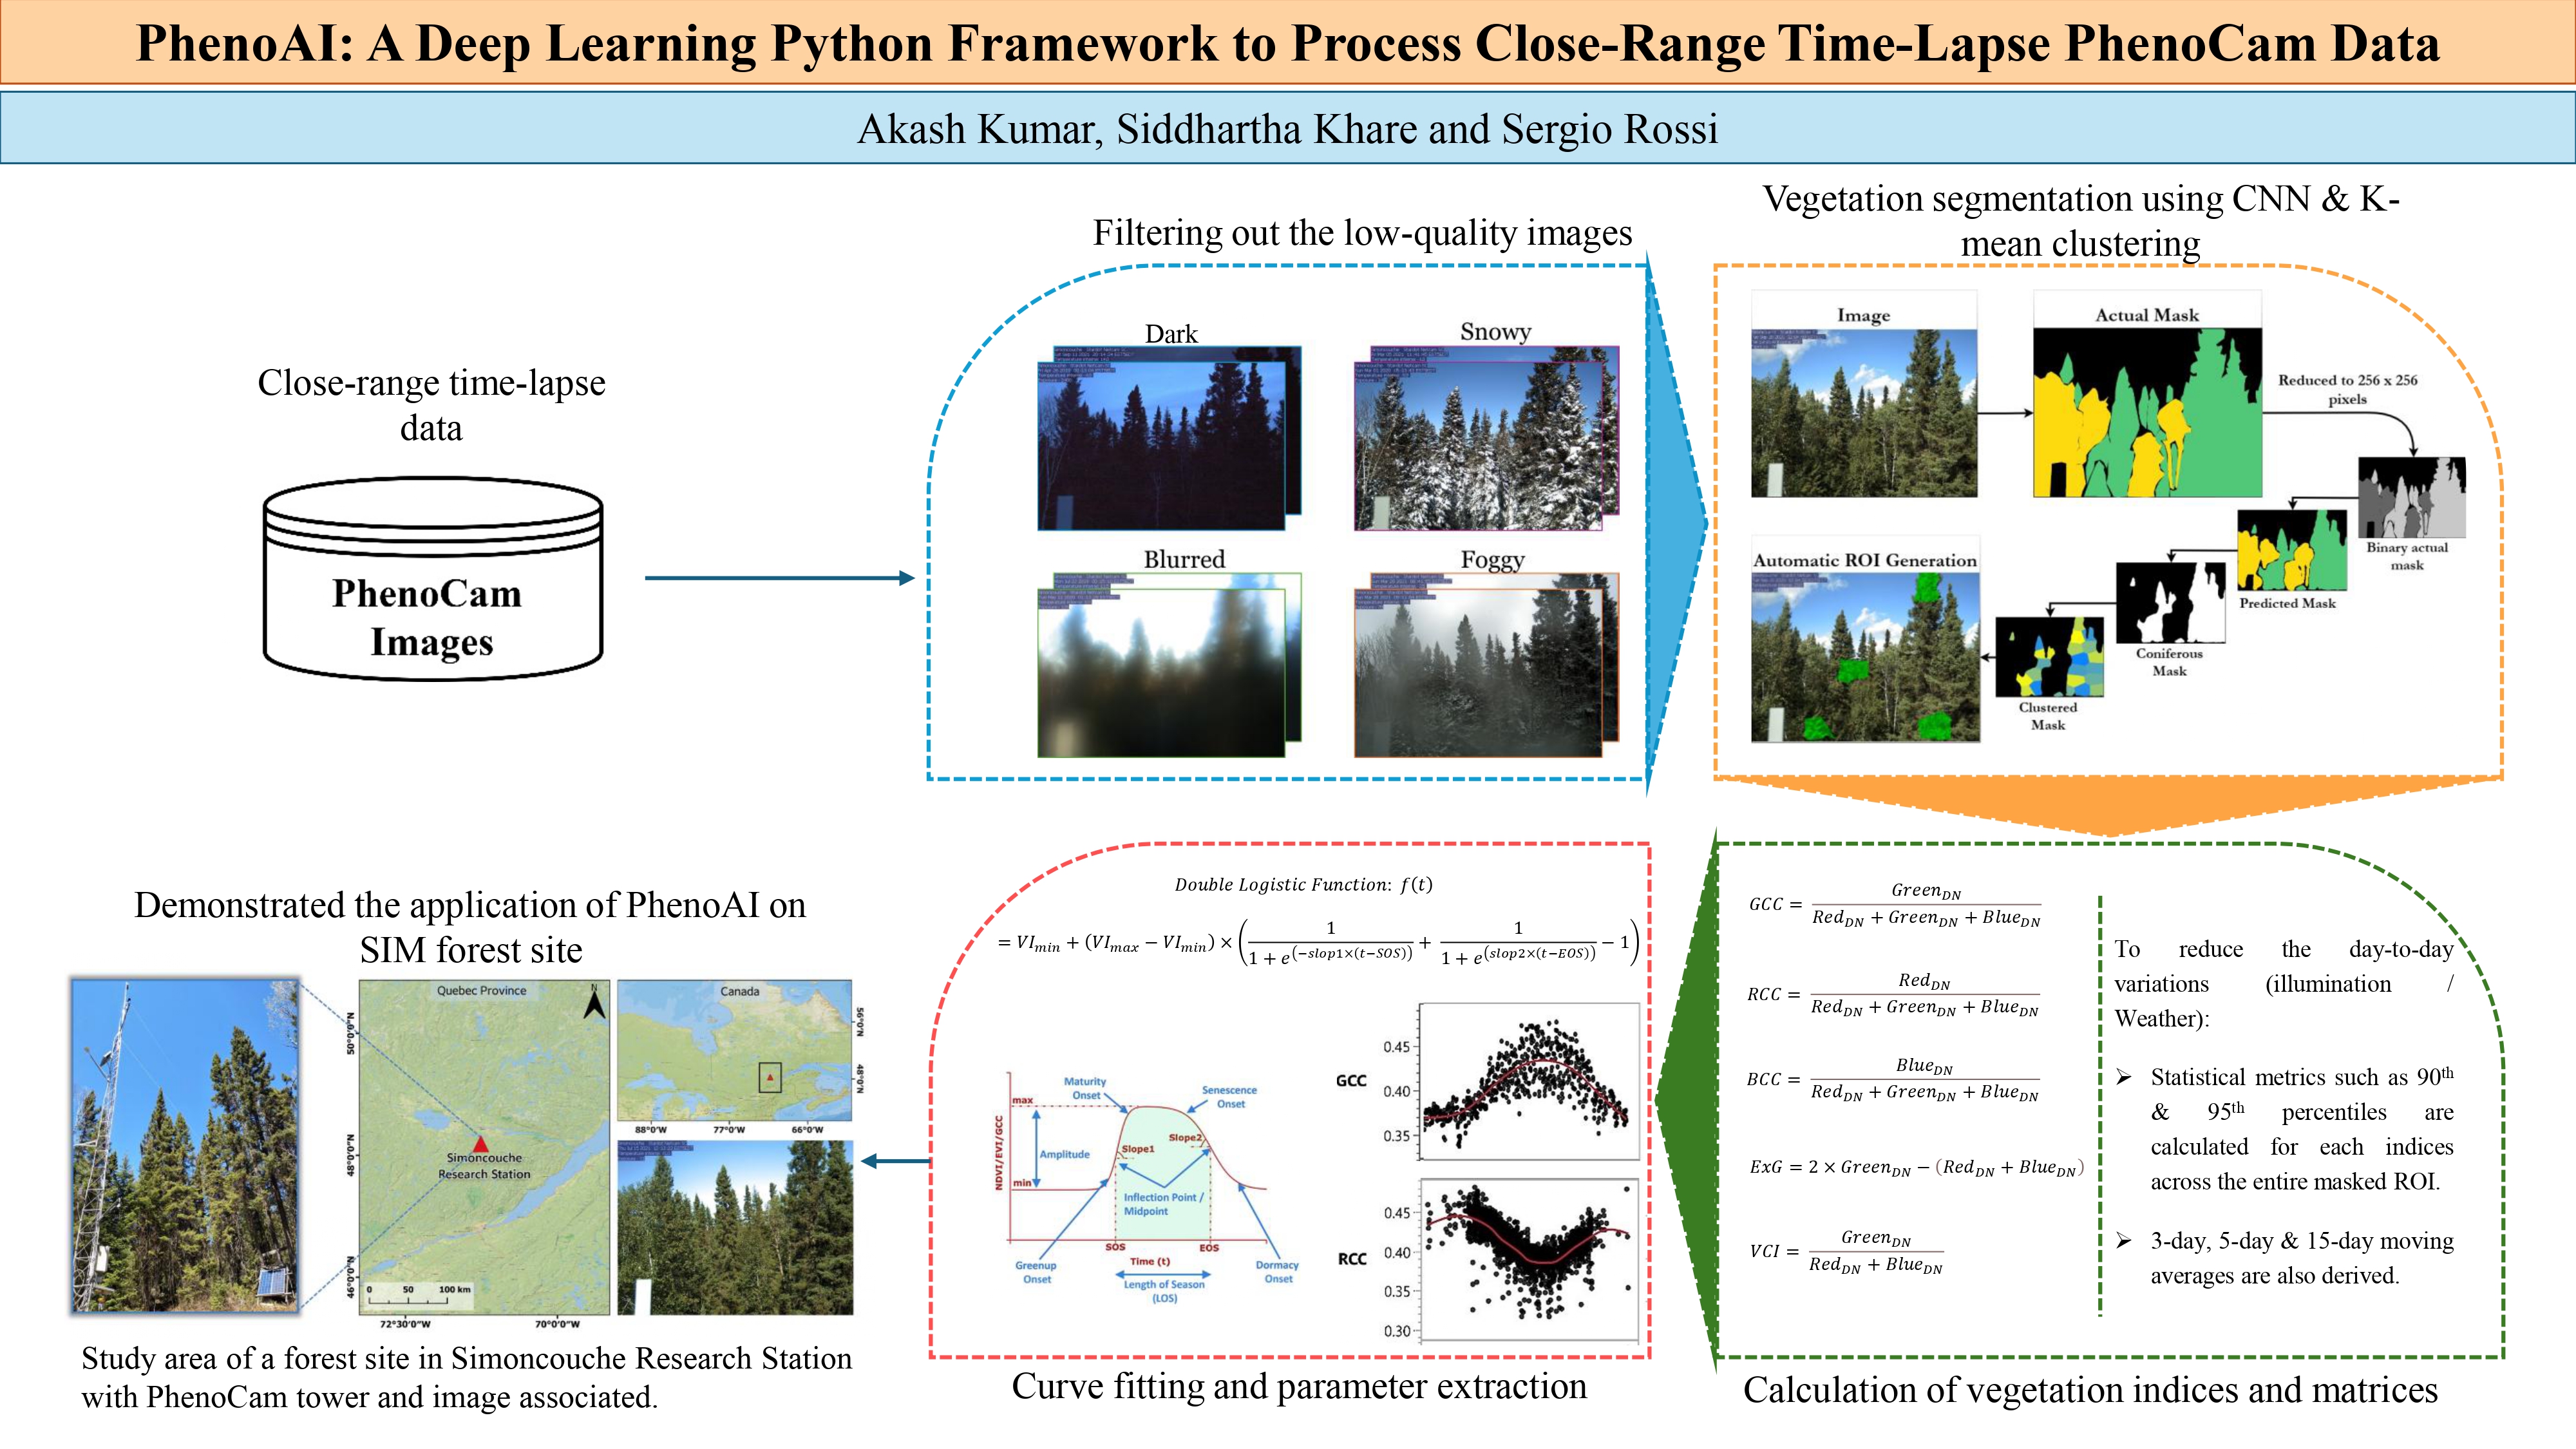
PhenoAI is a deep learning framework designed to automate the processing chain of phenological analysis of vegetation from close-range time-lapse PhenoCam data. This framework implements several techniques to provide comprehensive vegetation monitoring, segmentation, and temporal analysis capabilities.
Research Publication: This work is part of the research paper:
"PhenoAI: A deep learning Python framework to process close-range time-lapse PhenoCam data"
by Akash Kumar, Siddhartha Khare, and Sergio Rossi
Published in Ecological Informatics, 2025
- 🔬 Advanced Image Quality Control: Automated detection and filtering of low-quality images
- 🌱 Vegetation Segmentation: Deep learning-powered vegetation extraction using semantic segmentation
- 📊 ROI Analysis: K-means clustering-based Region of Interest (ROI) generation and analysis
- 📈 Vegetation Indices: Comprehensive calculation of multiple vegetation indices (GCC, BCC, VCI, etc.)
- 🖥️ Professional GUI: Advanced parameter tuning interface with real-time preview
- ⚡ Batch Processing: Efficient processing of large-scale time-lapse datasets
- 📋 Interactive CLI: User-friendly command-line interface with guided workflows
# Install from PyPI (recommended)
pip install phenoai-package

# Or install with TensorFlow support
pip install phenoai-package[tensorflow]

# Or install all optional dependencies
pip install phenoai-package[all]
📦 Model File Download: Due to PyPI size limitations, the pre-trained model (355MB) is not included in the package. Download it separately:
- GitHub Release: Download
Basic_Vegetation_Model.h5from the latest release - Direct Download: Available in the GitHub repository under
/Model/directory - Alternative: The framework will prompt you to download the model on first use
# From GitHub releases (if PyPI is not available)
pip install https://github.com/kharesiddhartha/phenoAI/releases/download/v1.2.0/phenoai-1.2.0-py3-none-any.whl

# For development
git clone https://github.com/kharesiddhartha/phenoAI.git
cd phenoAI
pip install -e .# Launch interactive mode (recommended for beginners)
python -m phenoAI.cli --interactive
# Or if installed globally
phenoai --interactive
# Direct usage with parameters
python -m phenoAI.cli --input ./images --output ./resultsThe easiest way to get started is using the interactive CLI:
python -m phenoAI.cli --interactiveThis will present you with a menu-driven interface:
🌿 PhenoAI v1.2.0 - Phenological Analysis Framework
📚 Advanced Deep Learning for Close-Range PhenoCam Data Analysis

Select workflow:
1. 🔍 Image Quality Control
2. 🌱 Vegetation Segmentation
3. 📊 ROI Generation and Analysis
4. 📈 Vegetation Index Calculation
5. 🎯 Complete Workflow (All Steps)
6. 🖥️ Parameter Tuning GUI
7. ❌ Exit

Enter your choice (1-7):
from phenoAI import PhenoAI

# Initialize framework
analyzer = PhenoAI()

# Set input directory containing your time-lapse images
analyzer.input_dir = "path/to/your/images"

# Run quality control
quality_results = analyzer.step1_image_quality_control()

# Results will be saved to:
# - Output/01_processing/high_quality_images/
# - Output/02_low_quality_images/
Features:
- Automated blur detection using Laplacian variance
- Brightness and contrast analysis
- Noise level assessment
- Histogram-based quality metrics
# Run vegetation segmentation on quality-filtered images
segmentation_results = analyzer.step2_vegetation_segmentation()

# Results include:
# - Vegetation masks (binary)
# - Vegetation extraction (RGB)
# - Segmentation metrics and confidence scores
Deep Learning Model:
- Uses advanced semantic segmentation (DeepLabV3+ architecture)
- Pre-trained on diverse vegetation datasets
- Supports multiple vegetation types (grass, crops, trees, etc.)
- Confidence-based result filtering
# Generate ROIs using K-means clustering on vegetation areas
roi_results = analyzer.step3_roi_generation()

# Interactive ROI preview with professional GUI
analyzer.display_roi_preview_popup(segmentation_results)

# Select specific ROIs for analysis
analyzer.selected_rois = [0, 2, 4, 6]  # or use 'all'
ROI Features:
- K-means clustering on vegetation pixels
- Polygon-based ROI boundaries
- Interactive preview with colorful cluster visualization
- Customizable ROI selection
# Calculate comprehensive vegetation indices
vi_results = analyzer.step4_vegetation_indices()

# Available indices:
# - GCC (Green Chromatic Coordinate)
# - BCC (Blue Chromatic Coordinate)
# - RCC (Red Chromatic Coordinate)
# - ExG (Excess Green)
# - VCI (Vegetation Contrast Index)Launch the professional GUI for parameter optimization:
from phenoAI.gui import run_parameter_tuning

# Launch parameter tuning interface
run_parameter_tuning()
GUI Features:
- Real-time parameter adjustment with live preview
- 5 sample images per filter type
- Instant detection status feedback
- Professional Tkinter interface
- Save/load parameter configurations
# Process multiple directories
import os
from phenoAI import PhenoAI

directories = [
    "dataset1/time_series_1/",
    "dataset1/time_series_2/",
    "dataset2/wheat_2024/"
]

for directory in directories:
    analyzer = PhenoAI()
    analyzer.input_dir = directory
    analyzer.output_dir = f"results/{os.path.basename(directory)}"

    # Run complete workflow
analyzer.run_full_workflow()# Use custom segmentation model
analyzer = PhenoAI()
analyzer.segmentation_model_path = "path/to/your/custom_model.h5"
# Set custom vegetation labels
analyzer.selected_vegetation_label = "crop" # or "grass", "tree", etc.# Customize ROI generation parameters
roi_params = {
"n_clusters": 8, # Number of K-means clusters
"min_roi_size": 100, # Minimum ROI size in pixels
"max_roi_size": 5000, # Maximum ROI size in pixels
"roi_shape": "polygon" # ROI shape type
}
analyzer.set_roi_parameters(roi_params)# Adjust quality control parameters
quality_params = {
"blur_threshold": 100.0, # Laplacian variance threshold
"brightness_min": 50, # Minimum brightness
"brightness_max": 200, # Maximum brightness
"contrast_threshold": 30 # Minimum contrast
}
analyzer.set_quality_parameters(quality_params)PhenoAI generates a comprehensive output directory structure:
Output/
├── 01_processing/
│   ├── high_quality_images/     # Quality-filtered images
│   └── processing_log.json      # Processing metadata
├── 02_low_quality_images/       # Rejected images with reasons
├── 03_segmentation_outputs/     # Vegetation masks and extractions
│   ├── masks/                   # Binary vegetation masks
│   ├── extractions/             # RGB vegetation extractions
│   └── metrics/                 # Segmentation confidence scores
├── 04_roi_analysis/             # ROI results and visualizations
│   ├── roi_boundaries/          # ROI polygon coordinates
│   ├── roi_previews/           # Visual ROI overlays
│   └── cluster_analysis/        # K-means clustering results
├── 05_vegetation_indices/       # Calculated indices
│   ├── gcc_results/           # GCC time series
│   ├── exg_results/            # ExG time series
│   └── comprehensive_indices/   # All indices combined
└── reports/
    ├── summary_report.html      # Comprehensive analysis report
    ├── quality_metrics.csv      # Quality control statistics
    ├── segmentation_metrics.csv # Segmentation performance
    └── temporal_analysis.csv    # Time-series vegetation indices
from phenoAI import PhenoAI

# Initialize analyzer
analyzer = PhenoAI()
analyzer.input_dir = "wheat_field_2024/"

# Run complete automated workflow
results = analyzer.run_full_workflow()

# Access results
print(f"Processed {len(results['high_quality_images'])} images")
print(f"Generated {len(results['rois'])} ROIs")
print(f"GCC temporal trend: {results['vegetation_indices']['gcc_trend']}")# Step-by-step processing with custom ROI selection
analyzer = PhenoAI()
analyzer.input_dir = "crop_monitoring/"
# Quality control
quality_results = analyzer.step1_image_quality_control()
# Vegetation segmentation
seg_results = analyzer.step2_vegetation_segmentation(quality_results)
# Generate and preview ROIs
analyzer.step3_roi_generation(seg_results)
analyzer.display_roi_preview_popup(seg_results)
# Manual ROI selection
analyzer.selected_rois = [1, 3, 5, 7, 9] # Select specific ROIs
# Calculate indices for selected ROIs only
vi_results = analyzer.step4_vegetation_indices(roi_subset=analyzer.selected_rois)# Launch GUI for parameter tuning
from phenoAI.gui import run_parameter_tuning
# Interactive parameter optimization
run_parameter_tuning()
# Apply optimized parameters
analyzer = PhenoAI()
analyzer.load_parameters("optimized_params.json")
analyzer.run_full_workflow()# If segmentation model fails to load
analyzer = PhenoAI()
analyzer.download_pretrained_model() # Download latest model
analyzer.segmentation_model_path = "Model/Basic_Vegetation_Model.h5"# Process in smaller batches
analyzer.set_batch_size(32) # Reduce batch size
analyzer.enable_memory_optimization(True)# If GUI fails to launch
import tkinter as tk
try:
root = tk.Tk()
root.destroy()
print("✅ Tkinter available")
except:
print("❌ Tkinter not available - install tkinter package")# Enable GPU acceleration (if available)
analyzer.enable_gpu(True)
# Parallel processing
analyzer.set_num_workers(4) # Adjust based on CPU cores
# Memory-efficient processing
analyzer.enable_lazy_loading(True)Main analysis framework class.
Methods:
step1_image_quality_control()- Image quality filteringstep2_vegetation_segmentation()- Deep learning segmentationstep3_roi_generation()- ROI clustering and generationstep4_vegetation_indices()- Vegetation index calculationrun_full_workflow()- Complete automated processing
Advanced parameter optimization interface.
Features:
- Real-time parameter adjustment
- Multi-image preview
- Parameter persistence
- Export/import configurations
from phenoAI.utils import (
    calculate_vegetation_index,
    apply_quality_filters,
    generate_roi_polygons,
    create_temporal_plots
)

# Calculate custom vegetation index
custom_vi = calculate_vegetation_index(
    image_path="sample.jpg",
    index_type="GCC",
    roi_coordinates=[(100, 100), (200, 200)]
)We welcome contributions to PhenoAI! Please follow these guidelines:
- Fork the repository and create a feature branch
- Follow PEP 8 coding standards
- Add comprehensive tests for new features
- Update documentation for API changes
- Submit a pull request with detailed description
# Clone for development
git clone https://github.com/your-username/phenoAI.git
cd phenoAI

# Create virtual environment
python -m venv phenoai_dev
source phenoai_dev/bin/activate  # On Windows: phenoai_dev\Scripts\activate

# Install in development mode
pip install -e .[dev]

# Run tests
python -m pytest tests/If you use PhenoAI in your research, please cite our paper:
Kumar, A., Khare, S., & Rossi, S. (2025). PhenoAI: A deep learning Python framework to process close-range time-lapse PhenoCam data. Ecological Informatics, 88, 103134. https://doi.org/10.1016/j.ecoinf.2025.103134

```bibtex
@article{KUMAR2025103134,
title = {PhenoAI: A deep learning Python framework to process close-range time-lapse PhenoCam data},
journal = {Ecological Informatics},
volume = {88},
pages = {103134},
year = {2025},
issn = {1574-9541},
doi = {https://doi.org/10.1016/j.ecoinf.2025.103134},
url = {https://www.sciencedirect.com/science/article/pii/S1574954125001438},
author = {Akash Kumar and Siddhartha Khare and Sergio Rossi},
keywords = {Close-range Remote Sensing, GCC, Forest Phenology, PhenoCam, Python, Deep Learning}
}
- Issues: GitHub Issues
- Discussions: GitHub Discussions
- Email: akash_k@ce.iitr.ac.in, siddhartha.khare@ce.iitr.ac.in
This project is licensed under the MIT License - see the LICENSE file for details.
- Deep learning models based on DeepLabV3+ architecture
- Vegetation index calculations following established remote sensing protocols
- GUI framework built with Python Tkinter
- Segmentation pipeline inspired by computer vision best practices
PhenoAI v1.2.0 - Advancing Phenological Research with Deep Learning
Developed by Akash Kumar, Siddhartha Khare and Sergio Rossi | Published in Ecological Informatics 2025

